Xuse User Guide: Themes Editing
This page is a how-to guide for people who want to take Xuse that bit further to create and/or install a custom theme. The guide provides details on:
- how to create a theme editing environment.
- how to create a theme editing project.
- how to create additional themes.
- how to install a theme.
- how to distribute your theme.
- how xuse themes are organised.
- how to install your theme.
- and how to contribute your new theme back to the xuse project if you would like to share it.
- Theme editing FAQ.
Creating a theme editing environment
To create a new Xuse theme you could simply extract the example project, generate the HTML and start to edit the theme files as described below. If you did this however you would risk losing all your work if you were to regenrate the HTML as the files would be overwritten.
To prevent such a calamity Xuse comes with some special commands to create a new theme editing project and new themes.
Create a theme editing project
- Navigate to a location of your choice and create the directory for your new theme editing project - e.g.
new-xuse-themes cdinto your new project directory.- Run the command:
where
xuse new-theme-project new-theme-namenew-theme-nameshould be replaced by a theme name of your choice. - Xuse will create the approporiate directory structure, create the new theme files (cloned from the
xuse-standardtheme), extract the example project and generate the HTML based on your new theme.

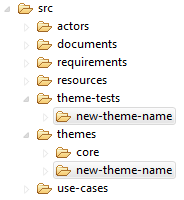
Once created you can open the src/theme-tests/new-theme-name/index.html in your browser to preview the the theme.
You can then edit the theme files and periodically refresh the browser to view your changes.
The expected folder structure is shown in the screenshot on the left.
Creating more themes
If you are really enthustiastic you can additional themes within your theme editing project.
- Navigate to your theme editing project directory.
- Run the command:
where
xuse new-theme another-themeanother-themeshould be replaced by a theme name of your choice. - Xuse will create the new theme files (cloned from the
xuse-standardtheme). - To generate the HTML files to preview your new theme you need to edit the
xuse.propertiesfile to have the following values:xuse.output.html.theme=another-theme xuse.theme.creation=yes xuse.output.dir=src/theme-tests/another-theme
- Then regenerate the HTML from the example project.

Once created you can edit your theme
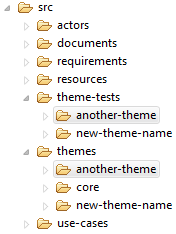
and preview it by opening src/theme-tests/another-theme/index.html
in your browser.
The modified folder structure is shown in the screenshot on the left.
Installing your theme
Once you have created your theme you need to install it in Xuse so that it can be used for any Xuse project on your computer.
- Navigate to your theme editing project directory.
- Run the command:
where
xuse install-theme new-theme-namenew-theme-nameshould be replaced by your theme name that you want to install. - Xuse will install the new theme files.
- Navigate to your standard projects and edit the
xuse.propertiesfile to use your new theme:xuse.output.html.theme=new-theme-name - Then regenerate the HTML to reference your new theme.
Distributing your theme
If you want to share your theme with others you can zip the theme directory so that you have a zip file called new-theme-name.zip. Xuse has a built in command to achieve this:
- Navigate to your theme editing project directory.
- Run the command:
where
xuse create-theme-distro new-theme-namenew-theme-nameshould be replaced by your theme name that you want to create the distribution from. - Xuse will create the file
new-theme-name.zip.
You can distribute this to friends and colleagues as you wish. They should install the theme by placing the zip file in a directory of their choice and then following the instructions from step 2 above.
Anatomy of a xuse theme

In Xuse a theme is a collection of CSS, Javascript and image files. Xuse has a built in "core" theme that provides the basic functionality and common styling.
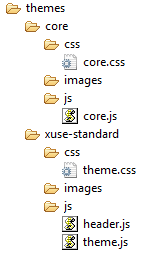
Whilst these files cannot be edited the settings are extended (and can be overridden) by the selected theme. An example of how the themes directory looks is shown on the left.
As you can see there is a top level themes directory under which there is the core containing the core css, javascript and images. Under the themes
directory there is also a folder named after the theme being edited or that has been selected for HTML generation (in this case xuse-standard the default xuse theme).
Under this we have a consistent css; images and js directory structure that must be present in all created themes.
To best understand the precedence of these theme files the HTML code below shows the typical head section of a generated page.
Note in this example {theme} would be replaced by the appropriate theme name e.g. xuse-standard.
<head>
   <meta http-equiv="Content-Type" content="text/html; charset=UTF-8">
   <title>xuse::Header</title>
   <link type="text/css" href="themes/core/css/core.css" rel="stylesheet">
   <link type="text/css" href="themes/{theme}/css/theme.css" rel="stylesheet">
   <script type="text/javascript" src="themes/core/js/core.js"></script>
   <script type="text/javascript" src="themes/{theme}/js/theme.js"></script>
   <script language="JavaScript" type="text/javascript">
                  window.onload = initHeader;
   </script>
</head>
Creating custom styles
If you want to customise css attrbutes for generated Xuse documentation you will need to edit the theme.css
(note the filename has to be theme.css so that it is referenced by the HTML correctly).
Depending on how you have created the theme.css file you may already have some css declarations that you can go and edit as you see fit.
If you have cloned one of the xuse built in themes you will be able to see all the css ids and classes that have been styled.
Please note that even the built in themes may not reference all the generated ids and classes so it is best to do a view source on the generated HTML to see what options there are for customising the styles.
Creating custom icons and images
All the images in the images directory can be customised but there are constraints. In a Xuse theme images are used in a couple of ways:
- Direct: Some images are directly referenced by the generated HTML and cannot be deleted. To enable custom styling images can be replaced but the replaced images must have the same name and be the same dimensions as the original.
- CSS: Other images that you might see in the built-in themes are typically referenced by the css for background images. As these are only referenced by the css you can add, replace or delete these images as you see fit.
| std. | sft. | filename | description |
|---|---|---|---|
 |
 |
R-plus.png | Red coloured icon for expanding the section (e.g. requirement detail). |
 |
 |
R-minus.png | Red coloured icon for collapsing the section (e.g. requirement detail). |
 |
 |
A-plus.png | Amber coloured icon for expanding the section (e.g. requirement detail). |
 |
 |
A-minus.png | Amber coloured icon for collapsing the section (e.g. requirement detail). |
 |
 |
G-plus.png | Green coloured icon for expanding the section (e.g. requirement detail). |
 |
 |
G-minus.png | Green coloured icon for collapsing the section (e.g. requirement detail). |
 |
 |
elbow.png | Used to create the folder navigation - represents an image that is logically an elbow. |
 |
 |
elbow-plus.png | Used to create the folder navigation - represents an image that is logically an elbow which can be expanded to show sub-level contents. |
 |
 |
elbow-minus.png | Used to create the folder navigation - represents an image that is logically an elbow which can be collapsed to hide sub-level contents. |
 |
 |
tee.png | Used to create the folder navigation - represents an image that is logically an tee. |
 |
 |
tee-plus.png | Used to create the folder navigation - represents an image that is logically an tee which can be expanded to show sub-level contents. |
 |
 |
tee-minus.png | Used to create the folder navigation - represents an image that is logically an tee which can be collapsed to hide sub-level contents. |
 |
 |
vertical.png | Used to create the folder navigation - represents a vertical space created by sibling items. |
| actor-icon.png | An icon for the actor model element. | ||
| package-icon.png | An icon for model packages. | ||
| req-icon.png | An icon for a requirement model element. | ||
| stakeholder-icon.png | An icon for a stakeholder model element. | ||
| use-case-icon.png | An icon for a use-case model element. | ||
| note-icon.png | An icon to indicate the presence of comments/annotations. | ||
 |
 |
spacer.gif | A generic spacer img used to alter layouts in some places. |
Adding Javascript event handlers
Xuse makes some use of Javascript functions to improve the usability of the generated HTML. For instance javascript is used to manage the navigation and to expand and collapse the detailed requirements sections.
Whilst it is not at all necessary to change the default javascript behaviour for your new theme, Xuse provides the facility to override the default functions or add new functions.
- To override functions simply declare a function with the same signature in
theme.js. - To add new functions and attach them to objects you can create your new functions in
theme.js, create the appropriateinitPage()function to attach the behaviour using the built-inattachEvent()function that is available fromcore.js. - If you want to store and retieve some global variables that will be available on every page you can add variables and functions to
header.jsthat is loaded by the header.html page (and is thus only refreshed if the frameset is refreshed).
Putting it all into action
This all sounds complicated so lets have a look at an example. Suppose I want to add a mouseover event to the first requirement (RQ0) in the requirements table to display a value retrieved from header.js then first I would create the appropriate accessors in header.js:
var myVar = 'Initial value';

function setMyVar( varValue ) {
    myVar = varValue;
}

function getMyVar( varValue ) {
    return myVar;
}
Then add the following to theme.js
/*
 * Example functions showing how you can read/write
 * to persistent global variables in header.js
 */

//Set a variable
function setMyVarInHeader( varValue ) {
    top.frames["header"].setMyVar( varValue );
}

//Get a variable value
function getMyVarFromHeader() {
    return top.frames["header"].getMyVar();
}

//Display the header value
function showHeaderVarValue() {
    alert('Value stored in header is: ' + getMyVarFromHeader());
}

/*
 * Example of init method attaching an event
 * To the first requirements row in the requirements
 * table in the example project
 *
 * Un-comment the lines to get it working
 */
function initRequirements() {
    /*
     * Set a global variable in header.js
     */
    setMyVarInHeader('Test variable value set from theme.js');
    /*
     * Attach a mouseover event to the object with id = 'RQ0'
     * When the event is fired the function
     * showHeaderVarValue() will be executed
     */
    attachEvent(document.getElementById('RQ0'),
                    'mouseover', showHeaderVarValue);
}
Now when you roll your mouse over the first requirement in the example project you should see the following 
Contributing Themes
We would love to add your artistic creations to the Xuse themes catalogue - the more themes we have the better it is for all concerned. There are two ways you can share your theme with the wider community:
- Submit your theme for inclusion in the core Xuse distribution.
- Keep your theme seperate from the core Xuse distribution but have it referenced from the themes catalogue.
The difference between these two is largely around Intellectual Property Rights (IPR). If you want your theme to form part of the core distribution then we need to maintain clean IPR rights and as such you will need to sign a Copyright Assignment Agreement. The benefit of this route is that your theme is likely to reach a wider audience.
If this sounds too daunting you can maintain all IPR for your theme and we will glady publicise your theme in the catalogue and host your theme distribution on our website.
In both cases your theme should be distributed in zip form as per the distribution instructions.
Theme editing FAQ
Arrgh - why are you using frames?
The Xuse HTML site was inspired by JavaDoc layout where the navigation frame is seperate from the content pane - I know frames are a pain from a CSS styling perspective but they keep the navigation simple.
If you think there is a better way of achieving the same effect without frames please feel free to email me at odlingsmee@users.sourceforge.net.

